How to remove wallpaper without destroying drywall or plaster, and properly prep the exposed wall for paint.
We often meet Northern New Jersey homeowners staring down a dated room, wondering if they should even attempt to pull down that stubborn floral print. Taking down old wall coverings is the crucial first step in any wallpaper prep for paint project.
The reality is that skipping proper wallpaper removal before painting just leads to bubbling and peeling down the line.
We see it happen constantly. Let’s look at the specific tools and techniques that actually work, and explore how to handle the inevitable wall damage.
Types of Wallpaper and Removal Difficulty
Modern strippable vinyl peels off easily in about an hour per room, while multi-layer or foil styles can take a full day and demand heavy steaming. We always classify removal jobs into four specific categories based on the material. Knowing what is on your walls determines the exact timeline and tools required for the project.
Strippable Vinyl and Traditional Paper
Modern strippable vinyl is the easiest material to handle. Homeowners can usually pull up a corner and peel it off in full sheets, finishing an entire room in about an hour.
Traditional paper wallpaper poses a moderate challenge. This material requires scoring, soaking with a removal solution like Zinsser DIF or a DIY hot water mix, and careful scraping.
Difficult Vinyl and Multi-Layer Situations
Old vinyl with paste residue ranks as a hard project. The top sheet often strips away, but it leaves behind a heavy, stubborn layer of glue that requires thorough washing with Trisodium Phosphate (TSP).
Multi-layer surfaces, where someone hung new wallpaper directly over an old layer, are very hard to clear. Each layer comes off separately, so you must budget a full day per room to finish the job.
The Challenge of Foil and Textured Designs
Foil or textured vinyl is the hardest material to strip. These impenetrable surfaces require aggressive scoring followed by heavy moisture.
We frequently rely on the Wagner 725 Wallpaper Steamer for these stubborn jobs. The high heat softens the underlying adhesive without relying entirely on chemical solvents.
| Wallpaper Type | Difficulty Level | Typical Time Needed | Key Removal Tool |
|---|---|---|---|
| Modern Strippable Vinyl | Easy | 1 hour per room | Hands (Peel in sheets) |
| Traditional Paper | Moderate | 2 to 4 hours per room | Zinsser DIF & Scraper |
| Old Vinyl (Paste Residue) | Hard | 4 to 8 hours per room | TSP Wash |
| Multi-Layer | Very Hard | 8+ hours per room | Extended Soaking |
| Foil / Textured Vinyl | Hardest | 8+ hours per room | Wagner 725 Steamer |
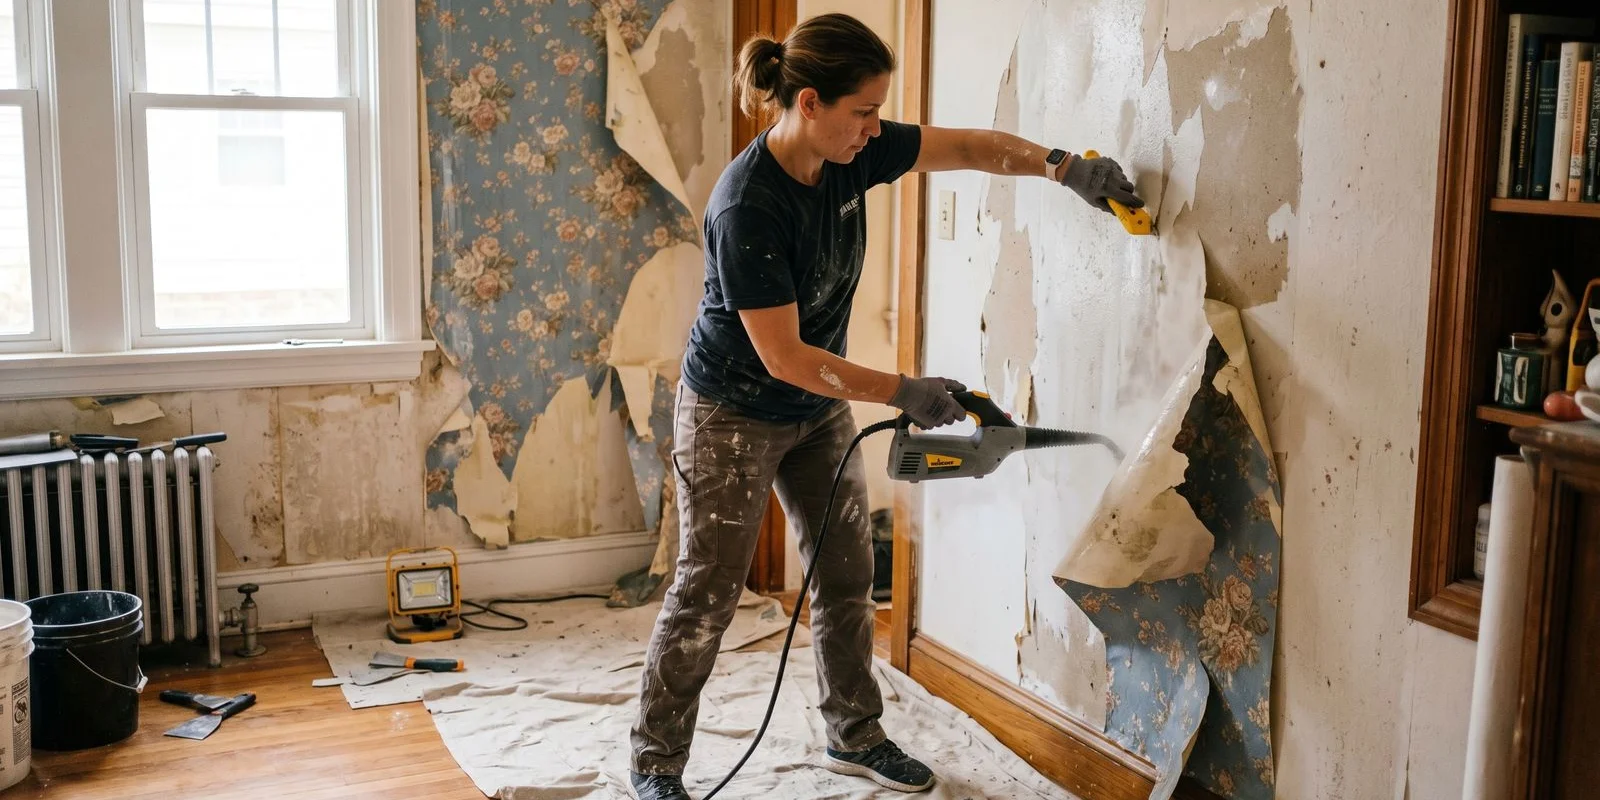
The Standard Removal Sequence
A successful removal sequence requires scoring the surface, applying a solvent, letting it dwell, and then scraping away the debris. Proper execution prevents wall damage and leaves a clean slate.
Our crew follows a strict 11-step process to learn how to remove wallpaper safely. Skipping any of these steps usually leads to frustration and damaged drywall.
- Score the wallpaper: Use a Zinsser Paper Tiger orbital scorer to perforate the surface just deep enough to break the seal.
- Apply removal solution: Spray a commercial wallpaper remover like Piranha Liquid, Zinsser DIF gel, or a one-to-one mix of hot water and fabric softener.
- Let dwell: Wait 15 to 20 minutes for the solution to penetrate the perforations.
- Scrape: Hold a Hyde 6-inch wallpaper scraper at a low angle to avoid gouging the wall.
- Remove in sheets when possible: Work top-down on each section for the best leverage.
- Wash residual paste: Scrub the surface with a TSP solution or a dedicated paste remover.
- Rinse: Wipe down the walls with clean water and a fresh sponge.
- Dry thoroughly: Allow a full 24 hours for the room to dry.
- Skim coat if needed: Apply a thin layer of joint compound over any minor damage or stubborn paste residue.
- Prime: Roll on a high-quality, stain-blocking primer.
- Paint: Finish the project with two coats of your chosen color.
Drywall vs Plaster Considerations
Drywall requires gentle scraping to avoid tearing the delicate paper face, while older plaster walls are much harder and can withstand heavier soaking. We handle both materials regularly across older Northern New Jersey neighborhoods. The strategy you choose depends entirely on what sits behind that floral print.
Managing Delicate Drywall
Drywall surfaces require extreme caution when you remove wallpaper drywall backing. The outer paper face lifts very easily if your scraper angle is too steep.
Minor gouges are common, but they are easily patched with joint compound. Heavy paste residue sometimes refuses to wash off, and in those cases, applying a full skim coat using USG Plus 3 compound creates a fresh, smooth surface.
Working with Resilient Plaster
Plaster walls, which are very common in homes built before the 1960s, are significantly more forgiving. The hard plaster surface does not peel or tear like modern drywall paper.
Paste bonds differently to this traditional material, meaning it often needs an extended soak time to release properly. Any structural cracks discovered during the stripping process must be patched and sanded before any primer touches the wall.
Choosing the Right Primer
Sealing the surface correctly is mandatory after any removal job.
- For Torn Drywall: We highly recommend applying Zinsser Gardz water-based sealer. This specific product locks down torn drywall paper and prevents residual glue from ruining your topcoat.
- For Water Stains: Oil-based options like Kilz Original work best to block old stains from bleeding through.
- For Smooth Plaster: A standard high-quality latex primer usually does the trick once the wall is clean and dry.
The Walls We Find Under Wallpaper
Removing old wall coverings frequently reveals hidden cracked plaster, uneven repair work from previous decades, and heavily stained surfaces. Our teams constantly uncover a variety of historical surprises hiding just beneath the surface. Knowing what to expect helps you prepare the right repair materials.
Common Structural Issues
A freshly stripped wall rarely looks perfect. Homeowners often discover large, jagged cracks traversing their plaster that have been hidden for decades.
Uneven repair work is another frequent issue. Previous owners often used heavy wall coverings specifically to hide terrible patching jobs.
Stains and Paint Hazards
Smoke damage or long-dried water stains frequently become visible once the paper comes down. These specific blemishes require a heavy-duty stain-blocking primer to prevent them from ruining your new paint job.
You also might discover old layers of paint you never knew existed. This brings up a critical safety concern for properties built before 1978.
Safety Warning: Homes built prior to 1978 have a high probability of containing lead-based paint. The EPA Renovation, Repair and Painting (RRP) guidelines mandate specific safety protocols if lead is present. Scraping old painted surfaces without proper testing generates toxic, invisible lead dust. Always test suspect layers or hire certified professionals to handle the mitigation.
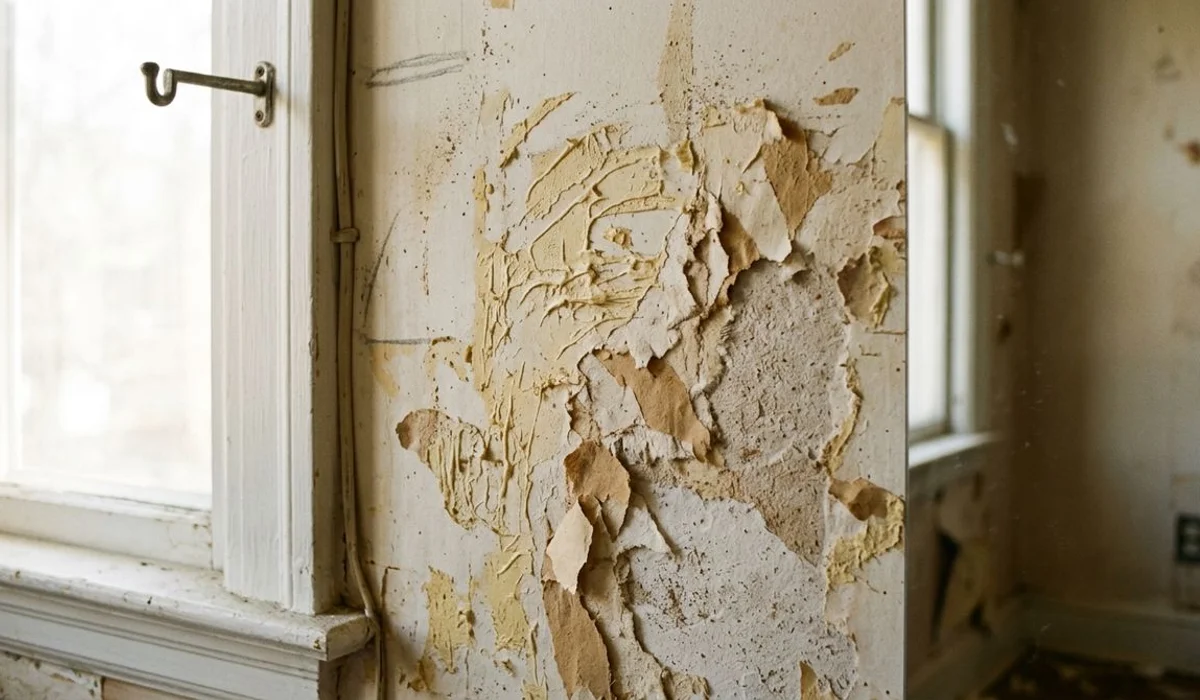
When Removal Destroys the Wall
In rare cases, removing wallpaper tears the underlying drywall paper so badly that full skim-coating or panel replacement is necessary. We evaluate these extreme scenarios during the initial walkthrough.
Sometimes, old paper wallpaper adheres so aggressively to unprimed drywall that it fuses with the paper facing. Pulling it down shreds the wall surface beyond simple spot repairs.
You can usually spot a compromised wall by looking for a few specific warning signs:
- Large chunks of brown paper backing exposed beneath the drywall face.
- Deep gouges where the scraper caught the softened gypsum board.
- A fuzzy, uneven texture across the entire surface that refuses to lay flat.
- Extensive bubbling when you apply a test patch of primer.
In the worst cases, fighting the removal simply is not worth the labor hours or the frustration. Applying a level-five skim coat over the entire room, or even executing a full drywall replacement, is often cheaper and faster. Zinsser Gardz can save moderately shredded walls, but severely compromised sheetrock must be replaced to ensure a flat finish.
We identify these worst-case scenarios during our initial project walkthroughs. Catching a fused wall early prevents wasted hours of scraping and sets realistic expectations.
If you want to skip the frustration, check out the full interior painting service details to see how the team handles everything from heavy wall prep to the final coat.